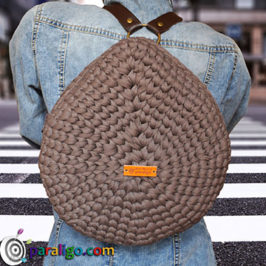
Crochet Backpack Easy to make easy to wear and easy on the eyes is the latest project of paraligo that I proudly present in this video. A Backpack quite unique due to its triangular shape and the versatility to convert into a purse in just seconds.
To create this crochet backpack I used a stitch the name of which I had to invent, one more time, as don’t have a clue about the original one. If any of you know a different name for this stitch, feel free to educate me with your comment.
The name I came up is frontal half double crochet as this stitch is a variation of the classic half double crochet. What makes it different is that this stitch begins by placing the hook under/ behind the yarn, instead of yarning over in the usual manner.
All the following steps of the stitch are identical with the plain half double crochet. We insert into the next stitch, then yarn over pull a loop, we then yarn over again and pull through all 3 loops on our hook.
To be able to create an invisible join for this bag, which turned out quite a challenge, I had to be really creative and use a combination of techniques. I also used a different stitch that I also arbitrary named frontal single crochet.
The frontal single crochet is only used in the first stitch of each round, from the second round and on. It’s similar to the frontal half double crochet in terms that the first yarning over is also being done by placing the hook under the yarn instead of over.
These slight differences in the stitches though they might not sound like much, surprisingly create a very nice frontage, of straight vertical lines. This makes these stitches ideal for use with flat yarns, such as the ribbon yarn that you will see me use in this project.
Supplies List: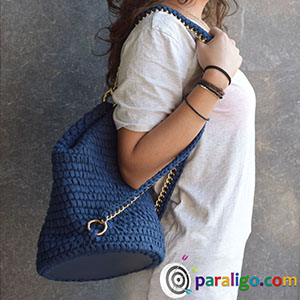
- 2 Skeins of Ribbon yarn 60%cotton 40%polyester 250 gr/125m (410ft) each
- A round perforated faux leather bottom 21cm Diam (8.26 Inch.) 44 holes
- 4 O rings with an inward opening 3.5cm diameter
- 1 O ring with an inward opening 2.5cm inner diameter
- Crochet hook 3.5mm (US NO: E-4)and 5.5mm (US NO: I-9)
- A metal chain strap 150cm (59 inch.)
- Zipper 30cm (12 inch.)
- Darning Needle
- Needle and thread for sewing
- Pins
- Scissors
Instructions:
Body of the Bag
Make a slip knot
Round 1: Insert hook Number 3.5 into the first hole of the bottom and pull the slip knot out. Chain one. Place 1 single crochet into the same hole. Place 1 single crochet into each hole and two single into the following. Repeat until one hole before the end of the base. Place 2 single crochet into the last hole.
Insert your hook into the chain from the beginning and slip stitch. Chain one.
Round 2: Insert your hook into the same stitch you chained Place your hook behind/ under the yarn (yarn under) and pull a loop. Change your hook to No 5 yarn over and pull through both loops on your hook.
Place your hook behind/ under the yarn, insert into the and pull a loop. Yarn over and pull through all 3 loops on your hook. Repeat until the end of the round. Place the last stitch into the base of the first stitch of the round. Skip one stitch and slip stitch into the following. Finally Chain one.
Rounds 3-22: Repeat round 2
Round 23: Insert your hook into the same stitch you chained Place your hook behind/ under the yarn (yarn under) and pull a loop. Yarn over and pull through both loops on your hook
Place your hook behind/ under the yarn, insert into the and pull a loop. Yarn over and pull through all 3 loops on your hook. Repeat until the end of the round. Place the last stitch into the base of the first stitch of the round.
Cut your yarn and fasten off. Insert your hook under both loops of the first stitch of the last round from the reverse side of your work and pull the tail in. Insert your hook into the back loop of the last stitch of the last round and again pull the tail in.
Thread the tail to your darning needle and weave it on the reverse side of the stitches at the inside of the bag. Make sure to tie a couple of knots before you cut the excess.
Strap
Make a slip knot with your Hook No 3.5. Release and insert your hook into the first hook of the metal chain. Pull the Slip knot out and chain one. Bring the tail to the front to carry. Yarn under, insert into the same hook, pull a loop, yarn over and pull through all 3 loops on your hook. Yarn under, insert into the next hook of the metal chain pull a loop, yarn over and pull through all 3 loops on your hook. Repeat until the last hook of the metal chain.
Chain one cut your yarn and fasten off. Thread the tail to your darning needle and hide to the reverse side of the stitches.
In the end, secure the tail at the beginning and the end of the strap by sewing with the sewing needle and thread.
Zipper attachment
Use the pins to place the zipper at the proper point and then sew it on your back using needle thread and the backstitch technique.
Ο-Rings arrangement to use as a Backpack
Close the zipper and place 2 of the bigger O rings under 2 stitches of the last row of the bag at the beginning and the end of the zipper.
Place the rest 2 big O Rings, each under 2 stitches of the 3d round of the bag. Put them 4-5 stitches away from the point where the diameter of the base would intersect the perimeter, on both ends of the diameter.
Insert the strap into the hook placed where the puller of zipper stands when sealed and fold it in the middle. Bring the two ends of the strap through the hook at the other end of the zipper. Pull the ends of the strap so that the ends of the zipper will meat and fold the top of the bag to form a triangle. Insert the last hook of each end of the strap into the two O rings at the base of the bag.
Ο-Rings arrangement to use as a shoulder Bag
Release the strap from the bottom hooks and remove the bottom hooks from the bag. Align the ends of the strap in a parallel position and insert the 5th and smaller or ring into the last hooks of both ends of the strap to join them.
Pull the strap to separate the ends of the zipper and insert the O ring at the ends of the strap into the second O ring at the end of the zipper without the puller.
Tips:
- This pattern doesn’t specifically require an even or odd number of stitches. The number depends only on the bottom you are going to use (number of holes and diameter).
- If it is hard for you to acquire a round faux leather bottom you could also crochet a circular bottom with a diameter of around 20cms. If the bag bottom seems too big for you to use on a backpack, you could use one with a smaller diameter and begin the bag with double single crochet in each hole of the bottom.
- From the second round and on, each round begins with a chain and frontal single crochet in the same stitch you slip stitched to join the beginning to end of the round. Make sure to pull the loop of the frontal single crochet up, so that it will match the height of the following frontal half double crochet stitches. We don’t want to pull the chain a well (the first loop on the hook) otherwise it will show and ruin the effort to make an invisible join. For this reason, its best to release the second loop from the hook, untwist and pull it and then insert the hook back.
Enough of talking and lets start watching to be able to create an amazing Crochet Backpack Easy!