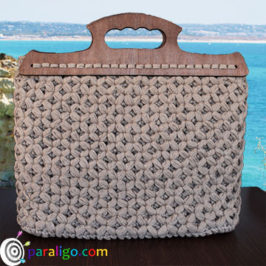
A statement crochet handbag you are about to witness being crafted in this new video with just one and a half skeins of yarn and a small zipper. It is minimal in design, it’s small but handy, and it’s perfect for Spring, Summer, Autumn, and winter. You can wear it all day long, it is suitable even for special occasions and it’s going to be your new obsession.
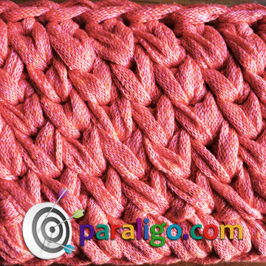
This elegant minimalist style handbag is worked in joined rounds. The handle of the bag is also worked in the round but in a spiral motion. The bottom of the bag is made using the waistcoat stitch, while the body and handle of the bag are made using the canestro stitch.
Supplies
- 2 Skeins of 3mm polyester cord (200m/160gr each)
- A 4mm crochet hook (US G6) –
- 5 Stitch markers (one in a different color)
- A 12cm Zipper
- A wool needle
- A curved needle and thread for sewing
- A lighter
- Scissors
Pattern
Abbreviations US terms: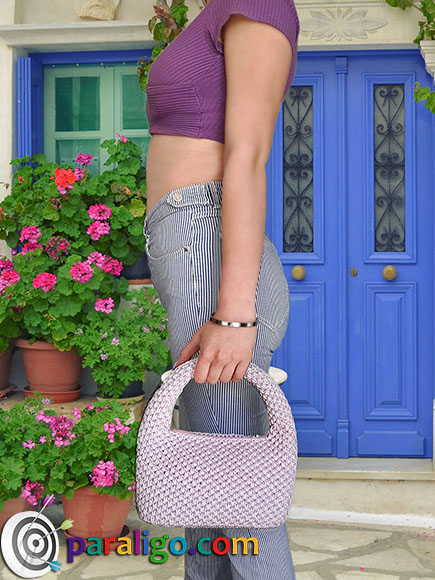
- Ch: chain
- Sc: single crochet
- Slst: slip stitch
- Wst: waistcoat stitch
- Can: Canestro stitch
- Inc: increase (2 waistcoat stitches into the same stitch)
- Bl: back loop
Oval Bottom:
- Foundation row: Ch. 22
- Round 1: 20sc into the next 20ch starting from the second ch from your hook. 3sc into the 21st ch, 20 ch into the next 20 ch, slst to join to the 1st st
- Round 2: 1 inc into the 1st st (same st you slst), 19wst into the next 19 st, 1 inc into each the next 3 st, 19wst into the next 19 st, 1increase into the next 2 st, 2 in into each of the last 2 st. Join the last wst of the last inc to the 1st st of the 1st round.
- Round 3: 1 wst into the 1st st (slst), 1 inc into the 2nd st, 19wst into the next 19 st, *1 wst into the 1st st, 1 inc into the 2nd st*, repeat **2 more times. 19wst into the next 19st, repeat ** 2 times. Join the last wst of the last inc to the 1st st of the 2nd round.
- Round 4: *1 inc into the 1st st, 2wst into the next 2 st*, 19wst into the next 19 st, repeat ** 3times. 19wst into the next 19 st, repeat ** 2 times. .Join the last wst to the 1st st of the 3d round.
- Round 5: *2 wst into the 1st 2 st, 1 inc into the 3d st, 1wst into the 4th st, *. 19wst into the next 19 st, repeat ** 3times. 19wst into the next 19 st, repeat ** 2 times. Join the last wst to the 1st st of the 4th round.
- Round 6: *1 inc into the 1st st, 4wst into the next 4 st*.19wst into the next 19 st, repeat ** 3times. 19wst into the next 19 st, repeat ** 2 times. Join the last wst of the last inc to the 1st st of the 5th round.
- Round 7: *5 wst into the 1st 5 st, 1 inc into the 6th st*. 19wst into the next 19 st, repeat ** 3times. 19wst into the next 19 st, repeat ** 2 times. Slipstitch to Join the last wst to the 1st st of the 6th round.
Body of the bag:
- Round 8: Ch 1, 1sc into each st. (80 st total)
- Round 9: 1sc into the 1st st, 1Can into the 2nd. Repeat until the end of the round. Slipstitch into the first stitch to join.
- Round 10: Ch 1, 1sc into the 1st st, 1Can into the 2nd. Repeat until the end of the round. Remove hook insert into the 1st st from the back and pull slipknot out. Bring yarn on top of slipknot, remove the hook and Insert into the 2nd st. Yarn over pull a loop, insert into the open loop at the back, yarn over again and pull through all loops on your hook.
- Round 11: 1sc into the 1st st, 1Can into the 2nd. Repeat until the end of the round. Remove hook insert into the 1st st from the back and pull slipknot out. Bring yarn on top of slipknot, remove the hook and insert into the same st (1st St). Yarn over pull a loop, insert into the open loop at the back, yarn over again and pull through all loops on your hook.
- Round 12-25: Repeat round 11
- Cut your yarn fasten off, thread your tail to your needle insert into the 2nd stitch and then into the back loop of the last stitch. Weave the tail in the interior of the bag and cut the excess.
Handle:
- Mark 17 st at each end of the body of the bag. Mount your yarn at the 1st st of the 1st group of 17stitches, with a chain.
- *Place a sc into this 1st st. Place a canestro into the 2nd st*. Repeat ** until the 17nt stitch.
- Round 2: Join the sides of the bag and *place a can into the 1st st. Place a sc into the 2nd st*. Repeat ** until the end of the round.
- Round 3: *Place a sc into this 1st st. Place a canestro into the 2nd st*. Repeat ** until the end of the round.
- Cut your yarn fasten of thread your tail to your needle insert into the 2nd stitch and then into the back loop of the last stitch. Weave the tail in the interior of the bag and cut the excess.
- Mount your yarn at the 1st st of the 2nd group of 17stitches, with a chain.*Place a sc into this 1st st. Place a canestro into the 2nd st*. Repeat ** until the 17nt stitch.
- Round 2: Join the sides of the bag and *place a can into the 1st st. Place a sc into the 2nd st*. Repeat ** until the end of the round.
- Round 3: *Place a sc into this 1st st. Place a canestro into the 2nd st*. Repeat ** until the end of the round.
- Cut your yarn leaving a tail of 150 cm. Fasten of thread your tail to your needle insert into the 2nd stitch and then into the back loop of the last stitch. Mount the end of the tail in the interior of the bag with a couple of knot and cut the excess.
- Thread the tail/loop to your wool needle and join the two ends of the handle with a seam that imitates the canestro stitch. End your seam bringing the loop at the interior of the bag. Weave the tail in the interior of the bag and cut the excess.
- Attach the zipper with a curved needle and sewing thread using the backstitch technique.
Tips
- It is very important that your work the entire bag with high tension. Your fabric must be stiff otherwise the bag will not hold the desired shape. This also applies to the handle.
- In order to achieve a dense fabric, you must make sure that you choose a yarn that produces such a fabric. Not all polyester cords are stiff so make sure to test your yarn before you begin your endeavor.
Without further ado, I will let you watch the video, get your supplies and create your own stunning Statement crochet handbag.