Why do women love Backpacks? Is it because of their hand-free design? Is it because they can fit everything they need to carry around? Is it because they look amazing and they come in a huge range of styles that suit every outfit and occasion? The answer is yes, yes, and yes. If you are one of these girls then stick around because you are going to adore this Crochet Teardrop Backpack.
Not only because it’s absolutely unique in design. But also, because it’s quite simple to make and requires literarily bare bone supplies that are easy to find. And trust me when I say that despite the name the only kind of teardrop this bag is going to bring to your eyes will be a teardrop of joy.
To create the Crochet Teardrop Backpack, you need to have knowledge of basic crochet techniques such as the chain, slip stitch, single crochet, single crochet increase and waistcoat stitch. The pattern is worked in joined rounds. The bag consists of two identical parts that are sewn together with the use of a wool needle and a pair of store-bought backpack straps.
Supplies
- 2 Skeins of T-shirt yarn 1200gr 200m
- 8mm crochet hook US: L-11
- Backpack straps
- 30cm zipper
- Wool needle
- Curved needle
- Thread for sewing
- 3 stitch markers
- Pins
- Scissors
Abbreviations
- Mr: Magic ring
- St: Stitch
- Ch: Chain
- Slst:Slip stitch
- Sc: Single crochet
- Ws: Waistcoat stitch
- Inc: Increase
- Trinc: Triple increase (3 waistcoat stitches into the same stitch)
Pattern
Foundation: Make a magic ring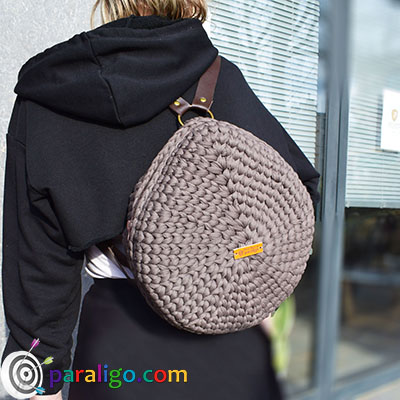
1st Round: 7 Sc into the Mr. Pull the tail to close the Mr. Join the round (remove your hook and insert it into the 1st St from the backside of your work. Pull the open loop in and make it large. Pass the entire work the open loop. Pull your yarn to tighten the join.)
2nd Round: Insert into the post of the 1st St and yarn over pull a loop and Ch 1. Place 1 Ws into the same St. Place an Inc into the 2nd and 3d St. Place a Trinc into the 4th St. Place 3 stitch markers into the St of the Trinc. Place an Inc in each St until the end of the round. Join.
3d Round: Insert into the post of the 1st St and yarn over pull a loop and Ch 1. Place an Inc into the 2nd St. *Place a Ws into the 3d st. Place an Inc into the 4th St*. Repeat ** until the 1st stitch marker. Remove the stitch marker and place a Ws. Place the stitch marker back. Remove the next stitch marker and place a Trinc into the same St. Place the stitch marker back into the 2nd St of the Trinc. Remove the 3d stitch marker and place a Ws. Place the stitch marker back. Repeat ** until the end of the round. Join.
4th Round: Insert into the post of the 1st St and yarn over pull a loop and Ch 1. Place 1 Ws into the same St. Place 2 Ws into each of the next 2 St. *Place an Inc into the next St. Place 2 Ws into each of the next 2 St.* Repeat ** until the 1st stitch marker. Remove the stitch marker and place a Ws. Place the stitch marker back. Place a Ws into the next St. Remove the next stitch marker and place a Trinc into the same St. Place the stitch marker back into the 2nd St of the Trinc. Place a Ws into the next St. Remove the 3d stitch marker and place a Ws. Place the stitch marker back. Repeat ** until the end of the round. Join.
5th Round: Insert into the post of the 1st St and yarn over pull a loop and Ch 1. Place a Ws into each stitch until the end of the round. Join.
6th Round: Insert into the post of the 1st St and yarn over pull a loop and Ch 1. Place a Ws into each of the next 2 St. Place an Inc into the next St. *Place a Ws into each of the next 3 St. Place an Inc into the next St.* Repeat ** until the 1st stitch marker. Remove the stitch marker and place a Ws. Place the stitch marker back. Place a Ws into each of the next 2 St. Remove the next stitch marker and place a Trinc into the same St. Place the stitch marker back into the 2nd St of the Trinc. Place a Ws into each of the next 2 St. Remove the 3d stitch marker and place a Ws. Place the stitch marker back. Repeat ** until the end of the round. Join.
7th Round: Insert into the post of the 1st St and yarn over pull a loop and Ch 1. Place 1 Ws into the same St. Place one Ws into each the next 4 St. *Place an Inc into the next St.* Repeat ** until the 1st stitch marker. Remove the stitch marker and place a Ws. Place the stitch marker back. Place a Ws into each of the next 3 St. Remove the next stitch marker and place a Trinc into the same St. Place the stitch marker back into the 2nd St of the Trinc. Place a Ws into each of the next 3 St. Remove the 3d stitch marker and place a Ws. Place the stitch marker back. Repeat ** until the end of the round. Join.
8th Round: Round: Insert into the post of the 1st St and yarn over pull a loop and Ch 1. Place a Ws into each stitch until the 2nd Stitch marker. Remove the stitch marker and place a Trinc into the same St. Place the stitch marker back into the 2nd St of the Trinc. Place 1 Ws in each stitch until the end of the round. Join.
9th Round: Insert into the post of the 1st St and yarn over pull a loop and Ch 1. Place a Ws into each to of the next 4 St. Place an Inc into the next St. *Place a Ws into each of the next 5 St. Place an Inc into the next St.* Repeat ** until the 1st stitch marker. Remove the stitch marker and place a Ws. Place the stitch marker back. Place a Ws into each of the next 4 St. Remove the next stitch marker and place a Trinc into the same St. Place the stitch marker back into the 2nd St of the Trinc. Place a Ws into each of the next 4 St. Remove the 3d stitch marker and place a Ws. Place the stitch marker back. Repeat ** until the end of the round. Join.
10th Round: Insert into the post of the 1st St and yarn over pull a loop and Ch 1. Place 1 Ws into the same St. Place one Ws into each of the next 6 St. *Place an Inc into the next St. Place one Ws into each of the next 6 St.* Repeat ** until the 1st stitch marker. Remove the stitch marker and place a Ws. Place the stitch marker back. Place a Ws into each of the next 5 St. Remove the next stitch marker and place a Trinc into the same St. Place the stitch marker back into the 2nd St of the Trinc. Place a Ws into each of the next 5 St. Remove the 3d stitch marker and place a Ws. Place the stitch marker back. Repeat ** until the end of the round. Join.
11th -13nth Round: Insert into the post of the 1st St and yarn over pull a loop and Ch 1. Place a Ws into each stitch until the end of the round. Join.
14th Round: Insert into the 1st (top of the stitch both loops) yarn over pull a loop and Slst. Place one Slst in eas St until the end of the round. Cut the yarn, fasten off, and thread the tail to a wool needle. Insert the needle into the 2nd Slst pull your yarn and then insert the needle into the last Slst of the round back loop only and pull the yarn. Insert into the last St of the 13nth round and weave your tail in.
Make an exact copy of the first half of the bag. Attach the strap on the 10nth round of the 2nd half of the bag. Leave a tail of about 1m at the end of the 14th round and sew the two halves of the bag together.
Pin the zipper on the first half of the bag. Thread the tail to your wool needle and sew the halves of the bag together until one end of the zipper.
Sew the zipper on the bag. Continue your seam to join the two parts of the bag until the other end of the zipper.
At the end of the seam insert under the closet slipstitch at the interior of the bag. Cut the excess and weave the tail in.
Tips
- I chose to attach the back straps by embedding them to the 10nth. If you want to make it even easier you can finish your 2nd half of the bag the exact same way as the first and attach the back straps at the end with 3 spring rings.
- I chose to begin my seam that joined the two halves of the bag from the point where I finished the 14th round. That forced me to work half of the seam until my zipper and then return, working my seam twice to continue with the rest of the bag. If you want to avoid this you can cut and weave your yarn in at the end of the 14th round and then begin your seam after the end or beginning of your zipper.
Enough said and I will speak no more because it’s about time to gather your gear, watch the video and create your own stunning Crochet Teardrop Backpack.