As I move on with my Crochet Stitch Guide and after 7 posts dedicated to dense and thick stitches for crochet bags, I think it’s time for some fun. So this second chapter of my crochet bag-specific, stitch inventory, will be all about decorative stitches ideal for crochet bags.
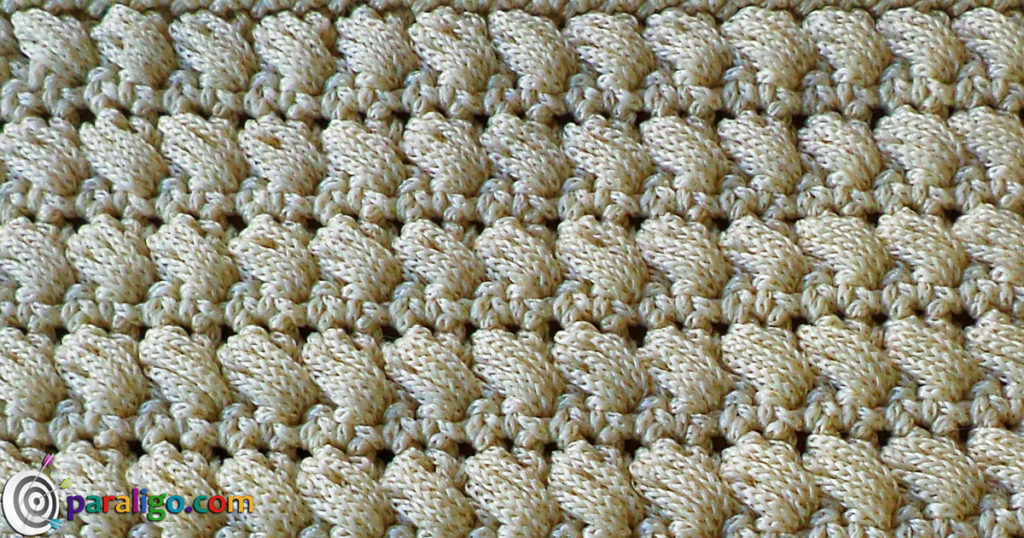
This new chapter of my crochet stitches types chart begins with the slanting bead stitch. The slanting as implied by the name is a variation of the bead stitch equally fancy, but also slightly easier and on top of that thick enough to create a beautiful non-transparent crochet fabric.
The stitch is formed by the combination of two stitches. A Double crochet and a puff stitch. The slanting bead stitch can be worked in rows and in joined rounds. When worked in rows it is a two rows repeat pattern and when worked in the round it’s a one-round repeat pattern.
The difference between the regular bead stitch and the slanting bead stitch is the following. To create a simple Bead stitch you skip a stitch of the foundation row and then place a double crochet into the next stitch. Next, you yarn over and insert your hook behind the post of this double crochet.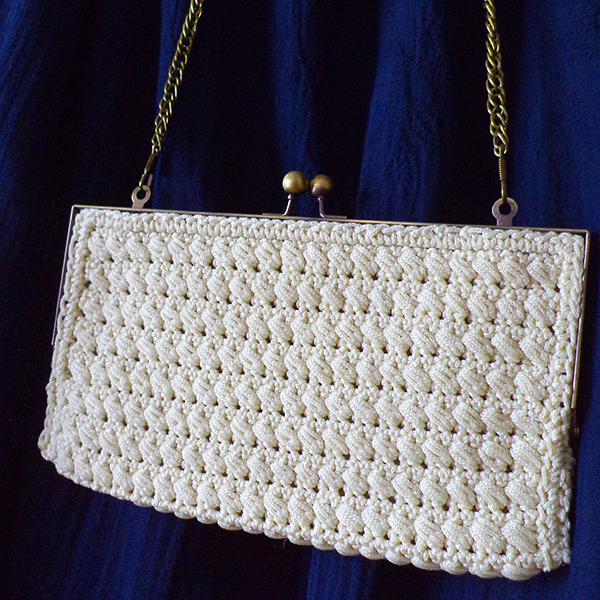
Then you yarn over and pull a loop three times working around that double crochet post. To complete the regular bead stitch you have to yarn over and pull through 6 loops on your hook. Finally, yarn over again and pull through the last two loops.
To work the Slanting Bead Stitch you skip a stitch of the foundation row and place a double crochet in the next. Then you yarn over go back and insert your hook into the previous skipped stitch. Next, you yarn over and pull a loop three times. To complete the stitch you yarn over and pull through all seven loops on your hook.
By working into the previous skipped stitch, the regular bead stitch develops a slope which results in a diagonal alignment of puffy bumps, that I find really easy on the eyes. This is what also adds extra thickness to the otherwise beloved regular bead stitch, the spaces between puffs are being filled.
The Slanting Bead Stitch in rows
Foundation
Chain an even number of chains plus one.
Round 1
Insert your hook into the second chain and place a single crochet (insert, yarn over, pull a loop, yarn over again and pull through both loops on your hook). Place a single crochet into each chain until the end of your chains. Chain 3 and turn your work.
Round 2
Skip the first stitch and place a double crochet into the next stitch (yarn over insert into the stitch, yarn over again pull through two loops, yarn over again and pull through the last two loops on your hook). Next yarn over go back to the previous skipped stitch and insert your hook. Then yarn over and pull a loop. Next yarn over insert into the same stitch yarn over again and pull a loop. Again yarn over insert into the same stitch, yarn over and pull a loop. Finally, yarn over and pull through all seven loops on your hook. This was the first slanting bead stitch. Repeat the same steps until the last but one stitch. Place a double crochet into the turning chain of the foundation row. Chain one and turn your work.
Round 3
Insert your hook into the first stitch that mounts the turning chain and place a single crochet. Place one single crochet into each stitch until the end of the row. Place your final single on the top of the three turning chains of the first round. Chain three and turn your work.
Round 4 and on
Repeat round 2 and round 3 until your work reaches desired height.
You can watch how to work the slanting bead stitch in rows in the following video:
The slanting bead stitch worked in joined rounds
Foundation
Chain an even number of chains. Insert your hook into the first chain and place a slip knot to join your chain into a circle (insert, yarn over, and pull through all loops on your hook).
Round 1
Chain 3.Skip the first stitch and place a double crochet into the next stitch (yarn over insert into the stitch, yarn over again pull through two loops, yarn over again and pull through the last two loops on your hook). Next yarn over go back to the previous skipped stitch and insert your hook. Then yarn over and pull a loop. Next yarn over insert into the same stitch yarn over again and pull a loop. Again yarn over insert into the same stitch, yarn over and pull a loop. Finally, yarn over and pull through all seven loops on your hook. This was the first slanting bead stitch. Repeat the same steps until the last stitch. Insert your hook into the top of the 3 chains in the beginning of the round and slip stitch to join.
Round 2 and on
Repeat round 1
Tips
- The slanting bead stitch is not decreasable and increasable and cannot be used to create shapes like circles squares triangles etc. If you must make adjustments to your number of stitches you best do that while working your rows of single crochet, making sure to keep working with even number of stitches.
- To make the best of this stitch it’s essential that your work your puffs nice and loose. To make your life easier with 7 loops on your hook make sure to work with a crochet hook that has a long shaft
Dos
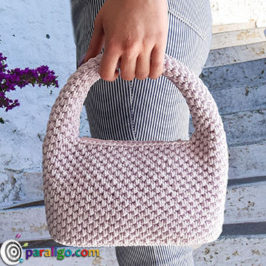
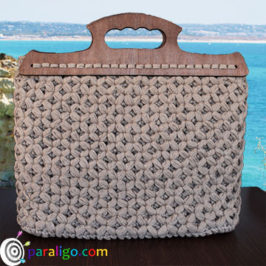
- The slanting bead stitch is a great stitch to be used in evening bags like pochettes and clutches, or bags with a vintage flair like kiss lock frame purses.
- This is stitch can look amazing with practically any kind of yarn. So if you love to experiment play with different yarn weights and prepare to be amazed. From voluminous chunky T-shirt yarn to the thinner cotton thread the slanting bead stitch looks simply adorable!
Don’t’s
- As I mentioned many times before, the slanting bead stitch could in theory be used to create any type of bag. My advice though would be not to use it for casual sporty looking bags. It is always a matter of taste but if you ask me this stitch is too decorative of a plain day bag and there are so many stitches that will better serve this purpose.
- Do not I say do not use this stitch if your yarn supply is of a certain budget. This stitch like most decorative stitches is what we call a yarn eater. So if you don’t want to spend too much yarn it best that you use another stitch.