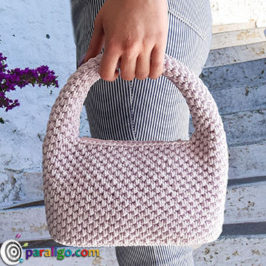
Crochet Basket Bag is the subject of this new video that you simply must watch. Not only because this crochet bag is really easy, but also because it’s designed to resemble one of the hottest fashion accessories for this summer. The Woven Straw Basket bag.
Natural fiber bags, made an amazing comeback this year and managed to win the hearts of even the most skeptical fashion lovers. Constructed in various shapes and styles they dominated Designer shows and became favorite fashion items of stars and celebrities.
The Crochet Basket Bag you are about to witness being created is not constructed of any natural fiber, but it is designed to imitate the shape of a very popular woven straw basket that I am certain you have stumbled across some store window or e-shop.
In order to serve the above-mentioned purpose, I took the liberty of using methods, such as the reverse slipstitch, that some of you may find kind of unorthodox, in terms of proper crocheting.
I will not claim that my technique is the most accurate one might use to construct a crochet bag, but I will contend that It came up after a lot of research, effort, and unfortunate attempts. So please be lenient!
Supplies List:
- 3 Skeins of Ribbon yarn 60%cotton 40%polyester 250 gr/125m each
- Crochet hook No 6mm (US NO: J-10)
- A pair of Round Bamboo handles 13cm inner Dia
- 4 stitch markers
- Darning Needle
- Scissors
Instructions:
1st half of the bag:
Make a slip knot
Row 1: Chain one around the handle. Bring your yarn to the front to carry. Place 19single crochet, around the handle. 19 st. Total. Chain one and turn.
Row 2: Skip the first stitch and place 5 slipstitches and then 1 single crochet and 1 half double crochet. Place a stitch marker into the half double crochet. Place 5 double crochet. Place 1 half double crochet and mark it with a stitch marker. Place 1 single crochet and 5 more slipstitches. Chain one and turn.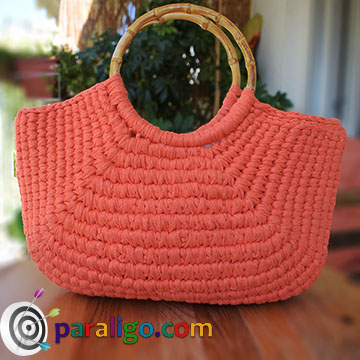
Row 3: Skip one stitch and place 6 single crochet inserting your hook under the next 6 stitches of the previous Row (long single crochet). Place 3 single crochet under the 7nth stitch and place a stitch marker into the second of those 3 single crochet. Place 5 long single crochet under the next 5 stitches. Place 3 single crochet under the 13th stitch and place a stitch marker into the second of those 3 single crochet. Place 6 long single crochet into the last 6 stitches. 23 st. total. Chain one and turn.
Row 4: Skip the first stitch and 1 slip stitch into each stitch until one stitch before the stitch marker. Place 1 single crochet, before the stitch marker and 1 half double crochet into the marked stitch. Place the stitch marker back into the half double crochet. Place 1 double crochet into each stitch until the next stitch marker. Place 1 half double crochet into the marked stitch and place the marker back. Place 1 single crochet after the marked stitch and 1 slip stitch into each stitch until the end of the row. Chain one and turn.
Row 5: Skip one stitch and place 1 long single crochet under each stitch of the previous row, until the stitch marker. Place 3 long single crochet under the marked stitch and place the stitch marker back into the second of those 3 single crochet. Place a long single crochet under each stitch of the previous Row until the next stitch marker. Place 3 long single crochet under the marked stitch and place the stitch marker back into the second of those 3 single crochet. Place 1 long single crochet under each stitch until the end of the Row. Chain one and turn.
Rows 6,8,10,12,14,16,18,20,22: Repeat Row 4!
Rows 7,9,1,13,15,17,19,21,: Repeat Row 5!
Row 23: Skip one stitch and place 1 long single crochet under each stitch of the previous Row, until the stitch marker. Place 1 long single crochet under the marked stitch and place the stitch marker back. Place a long single crochet under each stitch of the previous Row until the next stitch marker. Place 1 long single crochet under the marked stitch and place the stitch marker back. Place 1 long single crochet under each stitch until the end of the Row. No Increases. Chain one and turn.
Rows ,25,27,29: Repeat Row 23!:
Rows 24,26,28,: Repeat Row 4!
Cut the yarn fasten off and weave in the tail.
Stitch Count per Row:
Row 1: 19sc
Row 2: 12sc, 2hdc, 5dc Total of 19st.
Row 3: 23 long sc
Row 4: 12slst, 2sc, 2hdc, 7dc Total of 23st
Row 5: 27 long sc
Row 6: 14slst, 2sc, 2hdc, 9dc Total of 27st
Row 7: 31 long sc
Row 8: 16slst, 2sc, 2hdc, 11dc Total of 31st
Row 9: 35 long sc
Row 10: 18slst, 2sc, 2hdc,13dc Total of 35st
Row 11: 39 long sc
Row 12: 20slst, 2sc, 2hdc, 15dc Total of 39st
Row 13: 43 long sc
Row 14: 22slst, 2sc, 2hdc, 17dc Total of 43st
Row 15: 47 long sc
Row 16: 24slst, 2sc, 2hdc, 19dc Total of 47st
Row 17: 51 long sc
Row 18: 26slst, 2sc, 2hdc, 21dc Total of 51st
Row 19: 55 long sc
Row 20: 28slst, 2sc, 2hdc, 23dc Total of 55st
Row 21: 59 long sc
Row 22: 30slst, 2sc, 2hdc, 25dc Total of 59st
Row 23: 59 long sc
Row 24: 30slst, 2sc, 2hdc, 25dc Total of 59st
Row 25: 59 long sc
Row 26: 30slst, 2sc, 2hdc, 25dc Total of 59st
Row 27: 59 long sc
Row 28: 30slst, 2sc, 2hdc, 25dc Total of 59st
Row 29: 59 long sc
2nd half of the bag:
Repeat from Row 1 to Row 29 without cutting the yarn.
Assembly:
Place one half of the bag on top of the other with the wrong sides facing out. Place one long single crochet under each stitch of the last rows, of the two halves until the first stitch markers.
Remove the stitch markers and continue the seam by placing one long single crochet into the middle of the post of each stitch of the last rows of the two halves, until you reach the next stitch markers.
Remove the last stitch markers and place one long single crochet under each stitch of the last rows, until the end of the rows.
Turn the bag inside out, and upside down. Release your hook, insert into the first stitch of the left side of the top of the bag (right now that is upside down) grab the open loop and pull it out.
Place one slip stitch into each stitch of the top side until you reach the handle. Release your hook insert into the first stitch of the first row of this half of bag, from the inside and pull the open loop in.
Place one single crochet into each stitch of the first row, at the inside of the bag to attach the handle tighter to the bag.
When you reach the other end of the handle turn the bag upside up release your hook insert into the last stitch of the first row, from the outside of the bag, grab the open loop and pull it out. Place one slip stitch into each stitch of the right side of the top of the bag, working your stitches from left to right, until the end of the side.
Turn your work the other side and upside down. Repeat the same steps on this side of the bag. Cut the yarn fasten off insert your hook into the next but one stitch, from the inside of the bag front loop only, grab the tail and pull it in.
Release your hook insert into the last worked stitch from the outside of your work back loop only, grab the tail and pull it out.
Release your hook and insert into the next stitch from the inside of the bag, grab the tail and pull it in. Thread the tail to the darning needle and weave it in the inside of the nearest stitches. Make sure to make a knot before you cut the excess.
Tips:
- If you are wondering what kind of closure you should use for this bag, I have to tell you that the woven straw basket bag that my project imitates, comes with a drawstring lining that I skillfully avoided to demonstrate due to my notorious mastery in sewing.
- The yarn I am using for this project is one of my favorites because it’s really soft and easy on the hands. However if you wish to create an ever more convincing woven straw effect, you could also use Raffia or some other natural fiber. Just make sure you use a thick one so that won’t have to change the number of stitches.
- The only challenge that you will probably face while creating this bag, is to achieve uniformity between the left and right part of each half of the bag. Therefore It is important to observe you work after every row, to be able to adjust the tension and consequently the height of your stitches accordingly.
Enough said and I believe it’s about time to let you watch video and create your own beautiful trendy Crochet Basket Bag.