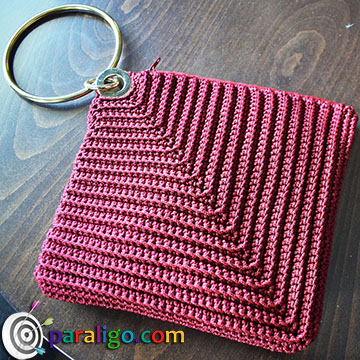
With a Crochet Diamond Clutch or to be more accurate a crochet Rhombus Clutch, paraligo says goodbye to winter and welcomes Spring paying Its respects to one of the hottest bag trends of spring and summer 2021. Geometry.
So we know it’s trendy and it’s definitely unique and original but is it difficult. Well, it actually is. This exquisite rhomboid crochet purse weird as it may sound is worked on rows and requires pretty basic crochet skills, but one or two extra metal adornments that you can easily find in the market.
Do not let the relatively long list of materials and tools scare you though because this crochet clutch is actually quite on a budget and what’s more important really fun to make.
 Supplies
- 2 Skeins of 2mm polyester macrame cord
- A 3.5mm crochet hook
- A 2cm(dia) eyelet
- A 3cm(dia)spring ring
- A 9cm(dia) hook handle
- A 12cm Zipper
- A darning needle
- A Needle
- A spool of matching thread for sewing
- Some Pins
- Round nose players
- A lighter
- A pair of scissors
Abbreviations
US Terms
- R: Row
- ch : chain
- sc: single crochet
- sl st : slip stitch
- st/sts : stitch/stitches
Instructions:
- Foundation: Chain 10 and sl st into the 1st st to join (10sts)
- Round 1: Chain 1 and Place 15 sc into the circle (15sts)
- R1: Ch 1 & place one sc into the back loop of each of the next 5 sts. Then ch.1 (11sts) & place one sc into the back loop of each of the next 5 sts. Turn your work and chain one
- R2: place one sc into the back loop of each st until you reach the chain. Place a sc into the back loop of the chain. ch.1 and place one more sc into the back loop of the chain. Place one sc into the back loop of each st until the end of the row. Turn your work and chain one (13sts)
- R3 –R34:Repeat R2 (77sts)
- Work a row of single crochet working from the end of row 34 towards the next side of the rhombus heading for the foundation circle. Turn your work and place 5 sc, 1ch, and 5 more single crochet into the ten loops remaining from R1.
- Repeat the entire pattern from R2 until R34.
- When you finish R34 place 1 sc into both loops of each stitch until the end of the row. Turn your work chain 1 and repeat. (no increases). Work a row of single crochet working from the end of row 36 towards the next side of the rhombus heading for the foundation circle.
- Place 1 slst into each st of the 1st row of the 2nd Rhombus to move to the 1st Rhombus. Work a row of single crochet working from the first side of the 1st Rhombus towards the end of th 34th Row of the 1st Rhombus (end of the corner). Then place 1 sc into both loops of each stitch until the end of the row, turn your work chain one and repeat. Place one Rhombus on top of the other with the Rhombus that carries the yarn (1st Rhombus) facing down.
- Release your hook insert into the corner st (opposite to the corner with the open-loop) of the upper Rhombus and then insert into your open loop and pull it out joining the two corners.
- Work a row of single crochet working from the end of row 36 towards the next side of the 2nd rhombus heading for the foundation circle.
- Release your hook, turn your work inside out and bring your skein out of the opening formed by the joined corners. Insert your hook into the open-loop and join the two rhombuses by placing a perimeter of slip stitches worked into the back loops of each stitch of each side of each Rhombus.
- Skip the already joined corner and continue slip-stitching until the end of the last but one side of each rhombus. Cut your yarn fasten off and weave the tail into the stitches.
- Turn your work inside out and attach the zipper.
- Attach the eyelet ring, insert the spring ring into the eyelet, and the hook handle into the spring ring.
Tips
- The way I used to work the perimeter of the bag was in order to avoid repeatedly cutting the yarn. If it’s too complicated for you, cut the yarn earlier. Work 2 more rows of single crochet worked on both loops of the last row (corner) of each Rhombus and work just 1 row at the sides of the Rhombuses.
- For a sturdier form use plastic mesh to reinforce your clutch and make sure to hide it by attaching linning.
Enough said and I will now leave to watch the video gather your gear and create your own unique, super trendy, Crochet Diamond Clutch!