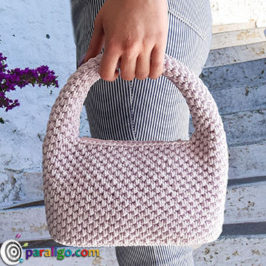
If you have never tried it, to create a crochet bag, or if you never even heard of this crochet stitch, I feel that that this is one of the posts that you will thank me for. Because I am about to introduce you to an amazingly beautiful, decorative, easy to work, dense, rich crochet stitch that doesn’t eat too much yarn. Ladies and gentlemen the Sailors knot stitch.
The Sailors knot Stitch is formed by the combination of two stitches. Regular single crochet and longer single crochet placed into the two vertical bars that form the letter v at the front of the single crochet of the previous round. It’s not increasable or decreasable and presents many similarities to the canestro stitch that we talked about in the second post of this group of articles dedicated to Dense stitches for crochet bags.
If you missed these previous posts click the following links to find out about the Waistcoat stitch, the Canestro stitch, and the Single crochet camel stitch. Unlike the Canestro Stitch, the Sailors’s knot stitch can only be worked in the round and in a spiral. If you stick around I will show how you can also work this stitch in joined rounds with an invisible join. Just keep reading!
Sailors knot stitch in the round in a spiral
Foundation
To work the Sailors Knot stitch in a spiral you need an odd number of chain stitches. Insert your hook into the last chain yarn over and pull through in a slip stitch to join the ends of your chain into a round.
Round One
Place one single crochet into each chain until the end of your chains. To do that, insert your hook into the first chain from your hook and place a single crochet. Yarn over, pull a loop, then yarn over again and pull through both loops on your hook. Repeat until the end of the round.
Round Two
Insert your hook into the next stitch and place a single crochet. Insert your hook into the next stitch and place a sailors knot stitch. To do that insert your hook into the two vertical bars that form the letter v at the front of the single crochet of the previous round. Then, yarn over pull a long loop that reaches the surface of the round, yarn over again and pull through both loops on your hook. Repeat these two stitches until the end of the round. When working in a spiral you should always end with the same stitch you began with. In this case, you must end with a single crochet.
Round three
Insert your hook into the first stitch and place a sailors knot stitch. Work a single crochet into the following stitch. Repeat these two stitches until the end of the round.
Round four and on…
Repeat round two and three.
You can watch how you can work the Sailors knot stitch in a spiral in the following video.
Sailors knot stitch in joined rounds
Foundation
To work the Sailors knot stitch in the round in joined rounds you need to chain an even number of chain stitches. Insert your hook into the last chain yarn over and pull through in a slip stitch to join the ends of your chain into a round. Then chain one.
Round One
Place one single crochet into each chain until the end of your chains. To do that, insert your hook into the first chain from your hook and place a single crochet. Yarn over, pull a loop, then yarn over again and pull through both loops on your hook. Repeat until the end of the round. Join the round with a slip stitch. Insert your hook into the first stitch of the round yarn over and pull through all loops on your hook. Then chain one.
Round Two
Insert your hook into the next stitch and place a single crochet. Insert your hook into the next stitch and place a sailors knot stitch. To do that insert your hook into the two vertical bars that form the letter v at the front of a single crochet. Then, yarn over pull a long loop that reaches the surface of the round, yarn over again and pull through both loops on your hook. Repeat these two stitches until the end of the round. When working in joined rounds you should always end with a stitch different than the one you began with. In this case, you must end with a sailor’s knot stitch.
Invisible join
Release your hook, insert into the first stitch of the round from the reverse side of your work and insert it into your open loop. Pull it in. Release again and insert your hook into the vertical bars that form the letter V at the front side of the first stitch, from the outer side of your work.
Then insert through the open loop at the inside of your work. Yarn over and pull through all loops on your hook. Pull a long loop to reach the surface of your round and chain one.
From the second round on the invisible join is worked as follows: Release your hook, insert into the chain at the beginning of the round from the reverse side of your work and insert into your open loop. Pull it in. Release again and insert your hook into the vertical bars that form the letter V at the front side of the second stitch from the outer side of your work.
Then insert through the open loop at the inside of your work. Yarn over and pull through all loops on your hook. Pull a long loop to reach the surface of your round and chain one You can watch how to work the Sailors knot stitch in joined rounds and the invisible join technique in the following video!
Round three
Insert your hook into the next stitch and place a sailors knot stitch. Work a single crochet into the next stitch. Repeat these two stitches until the end of the round. Make an invisible join.
Round four and on…
Repeat round two and three.
Tips
- The sailors knot stitch is not decreasable and increasable and cannot be used to create circles squares or triangles. If you need to make adjustments to your number of stitches you best do that while working your ground row of single crochet.
- To make the most of the amazing looks of the Sailors knot stitch, it’s important to work your stitches kind of loose. It might be a good idea to begin your 1st round of single crochet using one hook size bigger and change to the suggested size from the second round and on. Another trick is to pull the loop that follows the first yarn over higher than usual both in every single crochet and in every sailor’s knot stitch.
- To avoid placing both a single crochet and a sailor’s knot stitch into the same stitch follow the following steps. When finished with your single crochet always point at the top of the next stitch and then dive to insert your hook under the frontal bars to place the sailor’s knot stitch.
Dos
- The sailor’s knot stitch is a decorative stitch that would be amazing to be used in elegant formal bags like pochettes and clutches, or bags with a vintage flair like kiss lock frame purses.
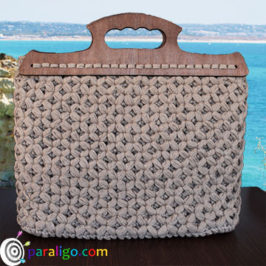
- Like the canestro stitch, the sailor’s knot stitch offers a rigid but not overloaded structure. This feature makes it a great choice for medium size bags with a perfect form that holds their load without weighing tones.
Don’t’s
- In theory, you could use the sailor’s knot stitch with any kind of yarn. My advice is to combine it with a thick yarn like a thick T-shirt yarn or a ribbon yarn to let its beauty shine.
- The sailors’ knot stitch has a very sophisticated appearance which to my humble opinion makes it not a good choice for sporty bags. Though this is clearly a matter of taste If I was planning to make a crochet backpack I would rather use a different stitch.
- Don’t use this stitch if your yarn supply is minimum. Similar to the canestro stitch it does not take up to much yarn but it still consumes more yarn than a single crochet.