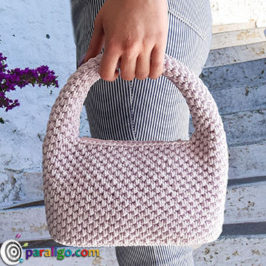
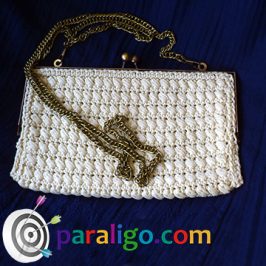
Have you ever tried to make a Crochet bag with metal frame? Well if you haven’t you definitely must because they are one of the hottest trends on bags for this year. If you don’t know how, this video is the perfect chance for you to find out. Because in 50 minutes we will cover how to make an oval bottom, the body of the bag, a spiral cord bag handle, and how to attach the kiss-lock clasp.
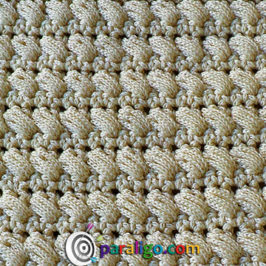
This cute chubby kiss lock purse is worked in the round with a stitch called the sailors’ knot and the use of T-shirt yarn. In one of my latest articles, I made an extended reference to stitches that work well with T-shirt yarn. The sailor’s knot stitch is one of these stitches. So if someone would like to make this bag with a different yarn which is I guess the most common question I get in comments, the answer would be the following.
You can try it but… First of all the choice of yarn has to do with the structure of the bag. When using kiss lock frames it’s almost impossible to reinforce a bag with plastic. So the handiwork itself should be rigid and keep its form. And what better yarn to achieve that than T-shirt yarn. And since metal frames have specific dimensions that do not exceed 25cm, coin purse clasp bags are by rule small bags which makes them ideal to be worked with T-shirt yarn.
Another issue that derives from using a different yarn with a specific pattern is the size of the end item. In this case, T-shirt yarn is a very thick medium that results in a small number of stitches and rounds needed to complete a bag. A much thinner yarn would require reconsidering the entire pattern from the number of chains to the stitches of the round and the number of rounds. So unless you are the adventurous type my advice is to stick to t-shirt yarn. So let’s see what else you are going to need to create this crochet purse.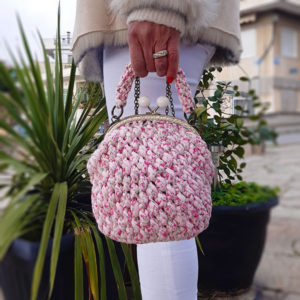
Supplies List
1/2 of a big skein of T-shirt yarn ( 800gr/120m)
An 8mm crochet hook
A 6mm crochet hook
A 2.5mm crochet hook
A sew on circular kiss-lock clasp of 16cm (dia)
A spool of crochet thread size 3 (color matching T-shirt yarn)
2 spring hooks of 1cm( dia)
A metal chain shoulder strap 110cm
4 stitch markers 2 of which in a distinct separate color
A darning needle
A curved mattress needle that fits the holes of your clasp
A pair of scissors
Instructions
Abbreviations US terms:
Mr: magic ring
Ch: chain
Sc: single crochet
Slst: slip stitch
Wst: waistcoat stitch
Sks: sailors knot stitch
Inc: increase
Bl: back loop
Oval Bottom
Foundation row: Ch. 5
- Round 1: 3sc into the the first 3 ch, 3sc into the 4th ch, 3 ch into the next 3 ch, slst to join to the 1st st
- Round 2: 1 inc into the 1st st, 2wst into the next 2 st, 1 inc into the 4th st, 1 inc into the 5th st, 1inc into the 6th st, 2wst into the next 2 st, 2 wst into the next 2 st, 2 in into the last 2 st. Join the last wst of the last inc to the 1st st of the 1st round.
- Round 3: 1 wst into the 1st st, 1 inc into the 2nd st, 3wst into the next 3 st, 1 inc into the 6th st, 1 wst into the 7th st, 1 inc into the 8th st, 1 wst into the 9nth st, 1 inc into the 10th st, 3wst into the next 3 st, 1 inc into the 14th st, 1 wst into the 15th st, 1 inc into the 16th st. Join the last wst of the last inc to the 1st st of the 2nd round.
- Round 4: 1 inc into the 1st st, 4wst into the next 5 st, 1 inc into the 6th st, 2 wst into the next 2 st, 1 inc into the 9th st, 2 wst into the next 2 st, 1 inc into the 12th st, 4 wst into the next 4st, 1 inc into 17nth st, 2 wst into the next 2 st, 1 inc into the 20th st, 2 wst into the last 2 st. Join the last wst to the 1st st of the 3d round.
- Round 5: 2 wst into the 1st 2st, 1 inc into the 3d st, 5wst into the next 5 st, 1 inc into the 9nth, 3wst into the next 3st, 1 inc into the 13 st, 3wst into the next 3st, 1 inc into the 17nt st, , 5wst into the next 5 st, 1 inc into the 22nd, 3wst into the next 3st, 1 inc into the 26th st, 1wst into the last stitch. Join the last wst to the 1st st of the 4th round.
- Round 6: 1 inc into the 1st st, 7wst into the next 7 st, 1 inc into the 8th st, 4 wst into the next 4 st, 1 inc into the 13th st, 4 wst into the next 4 st, 1 inc into the 18th st, 10 wst into the next 10st, 1 inc into 28th st, 4 wst into the next 4 st. Join the last wst of the last inc to the 1st st of the 5th round. 39 st total
- Round 7: 1sc into each st.
- Round 8: 1sc into the 1st st, 1sks into the 2nd. Repeat until the end of the round
- Round 9: 1sks into the 1st st, in sc into the 2nd . Repeat unitl the end of the round.
- Round 10,12,14,16,18,20: Repeat of round 8
- Round 11,13,15,17,19,21: Repeat of round 9
Cut your yarn fasten off thread your tail to your needle insert into the but one stitch and then into the back loop of the last stitch. Weave the tail in the interior of the bag and cut the excess.
Spiral Cord
- Foundation round: Magic ring
- Round 1: 3 Sc into the ring, & close the ring
- Round 2: 3 Sc into the bl of the 3sc
- Round 3: 3 Sc into slanting bar at the back of the 3sc
- Round 4- Last round: Repeat round 3
When the cord is 20-25cm long cut your yarn fasten off thread your tail to your needle, weave the tail in the interior of the bag, and cut the excess.
Insert the two spring hooks into the two ends of the cord.
Attach the kiss-lock clasp to the bag with the crochet thread and the curved needle. Start from the center of the bag and frame. Backstitch the frame to the bag working on the front loops of the last round of the bag only. Work each backstitch twice.
Tips
- Though a bit challenging for your hands work the base of the bag as tight as you can. The bottom of a bag is essential to entire of the end item. A rigid base will result in a nicely shaped bag.
- On the opposite side, the body of the bag should be worked kind of loose in order for the sailor’s knot stitch to reveal its true beauty.
- Crochet oval shapes tend to twist no matter how carefully worked. If your base ends up being a little twisted do not worry. Place a thin towel on top and give it a good ironing. This will solve the problem in a blink of an eye.
And with that said I will now let you enjoy the video, gather your supplies and make the chubbiest cutest Crochet bag with metal frame.