Crochet Clutch and Waist Bag two in one, is the topic of this new video from paraligo and the geometrically shaped crochet bag madness goes on. This time our crochet clutch is Oval, or elliptical, or ovate or egg-shaped. And now that I think of it I’ll stick to the last term, cause, after all, it’s Easter!
So you made your self a Pyramid Clutch and a Square Purse. Don’t you think it’s time for something curvy? It sure is and mark my word. These curves you are definitely going to wear proudly. Because they will form the sweetest crochet purse you have ever created.
This crochet Clutch is of medium difficulty and requires the knowledge of the following crochet techniques and stitches:
- Chain
- Slip stitch
- Single crochet
- Waistcoat stitch
The Bag is basically created using the waistcoat stitch. The body of this small crochet purse is comprised of 2 pieces joined together with slip stitches. To create the strap of the bag which is the key to its diverse way of wearing we use the single crochet stitch.
The pattern is a multiple of two plus 1 and the elliptical shape completes in 5 rounds. We add two repeat rows of waistcoat stitches without increases to give the bag the desired depth.
Click here to download the free printable pattern!
Supplies:
- 500-600 gr T-Shirt yarn (3cm/1.20inch wide when extended)
- Crochet hook No 7mm (US NO: K/10.75
- Crochet hook No 8mm (US No: L/11) /Crochet hook No 10mm (US No: N/15)
- Crochet hook No 6 mm (US No: J/10)
- 4 O Rings with inward opening 3cm /1.20” (intern. Dia)
- 1 O Ring with inward opening 2cm /078” (internal Dia)
- A metal chain shoulder strap (120cm /47”)
- 20- 25 cm/ 8-10 inches Zipper
- 4 Stitch Markers
- Darning Needle
- Sewing needle
- Resilient thread
- Scissors
Directions:
Start with a Slip knot and chain 5.
1st ROUND
Insert your hook into the 3d chain from your hook and place 1 single crochet into the chain. Yarn over pull a loop. Yarn over pull a loop and pull through both loops on your hook. Place 3 more single crochet into each of the next 3 chains.
Loosen Your Slipknot and place 3 single crochet into the slip knot. Pull the tail to tighten your slipknot again. Place 3 single crochet into the next 3 stitches. Place 2 single crochet into the 4th stitch.
Release your hook, loosen your open loop and insert your into the next stitch from the reverse side of your work. Grab your open loop and draw it in. loosen your open loop and pull your entire work through it. Pull your yarn to tighten and close the loop. 11 st.total.
2nd ROUND
Insert your hook into the post of the next stitch. Yarn over pull a loop, yarn over again and chain one. Place 2 single crochet into the posts of the next 2 stitches. In other words, place 2 waistcoat stitches. Now place 2 waistcoat stitches into each of the next 3 stitches.
Place a stitch marker to mark the first and the last of this 6 stitches. Place 3 waistcoat stitches into the next 3 stitches. Now place 2 waistcoat stitches into each of the next 3 stitches. Place a stitch marker to mark the first and the last of this 6 stitches.
Release your hook, skip the chain and insert your into the next from the reverse side of your work. Grab your open loop and draw it in. loosen your open loop and pull your entire work through it. Pull your yarn to tighten and close the loop. 17 st.total.
3d ROUND
Insert your hook into the post of the next stitch yarn over pull a loop and chain one. Place 1 waistcoat stitch into the next stitch. Remove the marker and place 1 waistcoat stitch into the first stitch. Place the stitch marker back and then place 2 waistcoat stitches into the next stitch. Repeat two more times, and remember to mark the last single stitch with a stitch marker.
Place 3 waistcoat stitches into the next 3 stitches. Remove the marker and place 1 waistcoat stitch into the first stitch. Place the stitch marker back and then place 2 waistcoat stitches into the next stitch. Repeat two more times, and remember to mark the last single stitch with a stitch marker.
Place 1 waistcoat stitch into the remaining stitch. Release your hook and insert into the next stitch from the reverse side of your work. Grab your open loop and draw it in. loosen your open loop and pass your entire work through it. Pull your yarn to tighten and close the loop. 23 st.total
4th ROUND
Insert your hook into the post of the next stitch yarn over pull a loop and chain one. Remove the marker and place 2 waistcoat stitches into the first stitch. Remember to place the stitch marker into the first. Then place 2 waistcoat stitches into the next 2 stitches. Repeat two more times, and remember to mark the last single stitch with a stitch marker.
Place 3 waistcoat stitches into the next 3 stitches. Remove the marker and place 2 waistcoat stitches into the first stitch. Place the stitch marker into the first. Then place 2 waistcoat stitches into the next 2 stitches. Repeat two more times, and remember to mark the last single stitch with a stitch marker.
Place 2 waistcoat stitches into the 2 remaining stitches. Release your hook, remove the stitch marker and insert your hook into that stitch from the reverse side of your work. Grab your open loop and draw it in. loosen your open loop and pull your entire work through it. Pull your yarn to tighten and close the loop. 29 st.total
5th ROUND
Insert your hook into the post of the next stitch and chain one. Place 2 waistcoat stitches into the next 2 stitches. Place 2 waistcoat stitches into the next stitch. Place 3 waistcoat stitches into the next 3 stitches. Place 2 waistcoat stitches into the next stitch. Repeat one more time, and remove the stitch marker. Place 3 waistcoat stitches into the next 3 stitches.
Remove the marker and place 3 waistcoat stitches into the next 3 stitches. Place the stitch marker into the first and then place 2 waistcoat stitches into the next stitch. Repeat two more times. Place 3 waistcoat stitches into the 3 remaining stitches.
Release your hook and insert your hook into the next stitch from the reverse side of your work. Grab your open loop and draw it in. loosen your open loop and pull your entire work through it. Pull your yarn to tighten and close the loop. 35 st.total
6th ROUND
Insert your hook into the post of the next stitch pull a loop and chain one. Place 1 waistcoat stitch into each stitch until the end of the round.
Release your hook, and insert your hook into the next from the reverse side of your work. Grab your open loop and draw it in. loosen your open loop and pull your entire work through it. Pull your yarn to tighten and close the loop.
7th ROUND
Insert your hook into the post of the next stitch pull a loop and chain one. Place 1 waistcoat stitch into each stitch until the end of the round.
Cut your yarn, fasten off insert your hook into the stitch after the chain from the reverse side of your work yarn over and pull the tail up. Insert your hook into the last stitch of the round, front loop only and pull the tail down. Thread your yarn to your darning needle and weave the tail in the reverse side of the stitches. Use the 7mm hook to weave in the short tail of the beginning.
That completed the first half of our bag. Create an exact copy using the exact same way. When you finish the 7th round of the second half of the bag cut your yarn leaving a long tail of around 1 meter. Thread the tail to your darning needle and bring the yarn at the inside οf your work.Crochet Clutch and Waist Bag 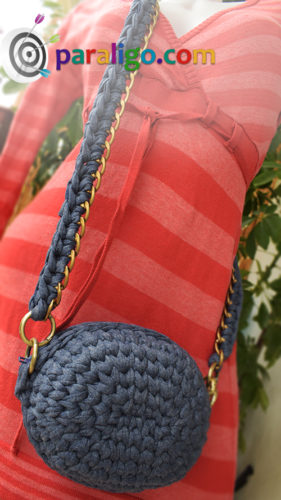
Insert the needle into the nearest reverse stitch and pass the yarn through the next four reverse stitches. These would be the first 4 stitches of the 7th round.
Put the zipper in place and mark or eyeball the beginning and end. Remove the darning needle and count 8 stitches from the join stitch of the 7th round. Place a stitch marker into the joining stitch of the 7th round of the other half of the bag.
Bring the two half’s together, with the two join stitches at a distance of 8 switches between them. Pin the two half’s together with the stitch marker. Use more if you must.
Turn the bag so that the tailless half is close to you, and the half with the tail on top. Insert your hook into the stitch close to your yarn, back loop only, and into the back loop of the corresponding stitch of the other half.
Yarn over and pull a loop. Insert your hook into the next stitch of the upper half, back loop only and into the corresponding stitch of the other half. Yarn over pull a loop and pull one loop through the other, in a slip stitch. Repeat into the next stitch, always back loop only. Continue slip stitching the 2 half’s together until you complete 17 slip stitches. Fasten off, thread the tail to your yarning needle
Insert into the back loop of the next stitch and bring the yarn at the inside of the bag. Weave the tail in the reverse side of the stitches, and tie a knot to secure it. Thread your sewing thread to your sewing needle and start placing back stitches of around 2cm each all along the zipper. Go twice in the ends.
When you reach the end of the side crossover and repeat. Finally, secure the thread at the reverse side of the zipper and cut it. To attach the zipper to the bag, insert your hook into both loops of the last slip stitch. Fold the end of your yarn, yarn over and pull a loop.
Insert into the next stitch both loops, yarn over pull a loop and slipstitch. Insert the hook into the next stitch and the 1st stitch of the bag. Pull one loop through the other in a slip stitch. Place the end of the zipper under the end of the seam.
Insert your hook into the next stitch, and the next stitch of the zipper, Yarn over pull a loop and slipstitch. Repeat until the end of the side. At the end of the side turn your work, open the zipper, insert your hook into the 1st stitch of the other side, yarn over and pull a loop, and pull one loop through the other. Slipstitch the rest of the zipper to the bag same way as with the first side.
When you reach the end, turn the bag, insert your hook into the last stitch of the seam both loops, yarn over pull a loop and slip stitch. Finally cut the yarn and fasten off.
Insert your hook into the next stitch from the reverse side and pull the tail in. Τie the two tails of the yarn at the inside of the bag, into a tight knot and weave the rest in. Cut the excess.
Insert 2 of the larger Ο Rings, into 2 stitches of both halves of the bag, at the beginning and the end of the zipper.
For the strap, take the chain and the 6mm hook, fold the end of your yarn. Insert the hook into the 1st chain, yarn over pull a loop, and chain two.
Insert your hook into the next chain and place single crochet. Μake sure to carry the tail. Continue until the end of the chain.
When you reach the end of the strap cut the yarn and fasten off. Insert the tail through your darning needle, and weave it in the reverse side of the switches.
Use your sewing the thread and needle to place a few stitches at the end of the tail to be more secure.
To complete the strap take the last 2 larger O rings and insert each one into both the first stitch and chain at the beginning and the end οf the strap. Finally, insert the O Ring of the strap to that of the bag on both sides and the bag is ready.
Tips:
- For this Bag Its imperative to apply extra tension to your stitches. This project needs to be tight and firm in order to achieve a nicely formed stable shape.
- As always yarn is the key. Use a thick good quality sleek T-shirt yarn to get the shape you see in the video. A thinner yarn not only will produce a much smaller bag, but will also cause the bag sides to twist.
- In the video, you will see me folding the strap into half and inserting the O-ring attached to the end of the strap, into the O-ring attached to the side of the bag. If your waist is larger you can fold a shorter part of the strap and then insert the O-ring of the strap to one of the metal chains of the strap (I hope I am making sense).
Enough of talking and time to gather your supplies watch the video and create your own amazing Crochet Clutch and Waist Bag!