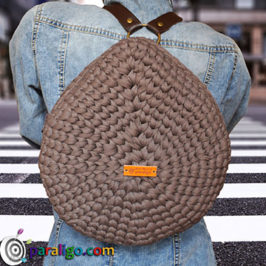
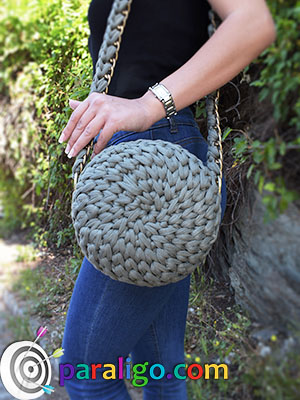
A Crochet Round Bag is the project that will draw the curtain to the chapter of Geometrically shaped crochet bags and I think you will all agree that in this case I literarily saved the best for last. So after a Triangular, a Square, and an Oval bag, it’s time for a chubby, pudgy, rotund purse.
in essence, this Round Crochet Bag is a macaron bag also known as macaroon bag with the distinguishing feature that is worked with a different stitch. A stitch that I took the liberty to name slanting waistcoat stitch. If one of you is aware of the original name please feel free to educate me.
The slanting waistcoat stitch, as obvious, is a variation of the waistcoat stitch that produces an also thick work, but with a more textured appearance and a beautiful spiral motion. The main disadvantage of this stitch is that one can only increase by doubling the number of stitches.
As a result by doubling your rounds or rows consecutively, your work will start to curl and become wavy. After a lot of experimenting and torturing my pour hands, I decided that for this project the best way to progress my work was by continuous rounds of increases followed by continuous rounds of zero increase, as described in the instructions below.
Supplies List
- 800-900 gr T-Shirt yarn (3cm/1.20inch wide when extended)
- Crochet hook No 6mm (US NO: J/10
- Crochet hook No 8mm (US No: L/11)
- 2 O Rings with inward opening 3cm /1.20” (intern. Dia)
- A metal chain shoulder strap (120cm /47”)
- 30 cm / 12 inches Zipper
- Darning Needle
- Sewing needle
- Resilient thread
- Lining fabric
- Scissors
Instructions:
Make a magic circle.
Round 1:
Use the hook size 8 to place 6 single crochet inside the circle. Pull the tail to close the ring tight. Release your hook and insert into the first stitch of the round from the back side of your work. Insert your hook into your open loop and draw it in. Loosen your open loop and pull your entire work through. Pull your yarn to close the loop.
Round 2:
Insert your hook through the join stitch, yarn over pull a loop and chain one. Place a single crochet into the next stitch. Go back and insert your hook under the original chain. Yarn over, draw a long loop, yarn over again and pull through both loops on your hook. That was your first slanting waistcoat stitch. Place a single crochet into the next stitch.
Now insert your hook into the post, of the previous stitch of the 1st round, into the v were we place a normal waistcoat stitch. Yarn over pull a long loop, yarn over again and pull through both loops on your hook.
Repeat these two stitches a single crochet and a slanting waistcoat stitch into the post of the previous stitch of the 1st round, until the end of the 2 round. 12 stitches total.
Release your hook and insert into the first stitch of the round from the back side of your work. Insert your hook into your open loop and draw it in. Loosen your open loop and pull your entire work through. Pull your yarn to close the loop. Insert your hook through the join stitch, yarn over pull a loop and chain one.
3d Round:
Insert your hook through the join stitch, yarn over pull a loop and chain one. Place a single crochet into the next stitch. Go back and insert your hook into the post of the chain of the 2nd Round. Place a slanting waistcoat stitch.
Place a single crochet into the next stitch. Now insert your hook into the post, of the previous stitch of the 2nd round, into the v that is short of covered by the waistcoat stitch. Place a slanting waistcoat stitch.
Place a single crochet into the next stitch. Insert your hook into the post, of the previous slanting waistcoat stitch of the 2nd round and place a new slanting waistcoat stitch.
Repeat these 4 stitches a single crochet and a slanting waistcoat stitch into the post of the previous stitch of the 2nd Round and round and then a single crochet and a slanting waistcoat stitch into the post of the previous slanting waistcoat stitch of the 2nd Round, until the end of the d round. 24 stitches total.
Release your hook and insert into the first stitch of the round from the back side of your work. Insert your hook into your open loop and draw it in. Loosen your open loop and pull your entire work through. Pull your yarn to close the loop.
4th Round:
Insert your hook through the join stitch, yarn over pull a loop and chain one. Place a single crochet into the next stitch. Go 2 rows down and insert your hook into the post of the previous slanting waistcoat stitch of the 2nd Round. Place a new slanting waistcoat stitch. The rest of the 4th round is a repeat of the 3d.
Place a single crochet into the next stitch and then a slanting waistcoat stitch into the hidden post of the previous round. Place a single crochet into the next stitch. Insert your hook into the post, of the previous slanting waistcoat stitch of the 3d round and place a new slanting waistcoat stitch.
Repeat these 4 stitches a single crochet and a slanting waistcoat stitch into the post of the previous stitch of the 3d Round and round and then a single crochet and a slanting waistcoat stitch into the post of the previous slanting waistcoat stitch of the 3d Round, until the end of the round. 48 stitches total.
Release your hook and insert into the first stitch of the round from the back side of your work. Insert your hook into your open loop and draw it in. Loosen your open loop and pull your entire work through. Pull your yarn to close the loop very tight.
5th Round:
Insert your hook into the stitch after the join, yarn over pull a loop and chain one. Skip the next stitch and insert your hook into the stitch that follows. Place a single crochet. Insert your hook back into the precious slanting waistcoat stitch of the previous round and place a new slanting waistcoat stitch.
Repeat the previous two stitches until the end of the round. Place the 47th stitch which will be a single crochet, into the same stitch you placed your chain. Place one final waistcoat stitch into the final waistcoat stitch of the previous round. 48 stitches total.
Release your hook and insert into the first stitch of the round from the back side of your work. Insert your hook into your open loop and draw it in. Loosen your open loop and pull your entire work through. Pull your yarn to close the loop very tight.
6th Round:
Repeat the entire pattern of the 5th Round. 48 stitches total.
7th Round:
Repeat the entire pattern of the 5th Round. 48 stitches total.
8th Round:
Repeat the entire pattern of the 5th Round. 48 stitches total.
Insert your hook into the space under your join yarn over and pull a long Loop. Insert your hook into the stitch next to the join, yarn over pull a loop and slipstitch. Insert your hook into the next stitch yarn over pull a loop and slipstitch. Place one slip stitch in each stitch until the last stitch of the round.
When you reach the last stitch cut your yarn and fasten off. Insert your 6mm hook into the first stitch of the round grab the yarn and pull it down. Insert your hook into the last stitch, back loop only from the reverse side, grab the tail and draw the yarn up.
Draw the tail at the inside of your York and weave it in the reverse side of the stitches, with your darning needle. Cut the excess
Make an exact copy of the 1st half of the bag and leave a tail of at least 1 meter. Thread the tail to your darning needle, bring the lips
of the 2 halves together, insert the needle into the closest slipstitch, of the opposite half and bring the yarn up.
Insert into the next slip stitch of the same half and the corresponding slipstitch of the opposite half and bring the yarn down. Insert into the next slip stitch of the same half and the corresponding slipstitch of the opposite half and bring the yarn up.
Insert into the next slip stitch of the same half and the corresponding slipstitch of the opposite half and bring the yarn down. Continue sewing the two halves of the bag together, in this meandering manner for 24 slip stitches.
In the end bring the yarn at the inside of the bag and weave it in the reverse side of the stitches. Attach your zipper and lining.
Use your 6mm Hook to make a slipknot. Release your hook and insert into the first metal chain. Pull your open in. Yarn over pull a loop and chain 2. Insert your hook into the next metal chain and place a single crochet. Make sure to carry the tail.
Insert your hook into the previous chain yarn over draw a long loop yarn over again and pull through both loops on your hook. Skip one metal chain and insert your hook into the next one. Place a single crochet. Insert your hook into the skipped chain and place a cross single crochet. Repeat the last two stitches until the end of the metal chain.
Cut your yarn fasten off and use your darning needle to weave in the tail to back side of the strap.
Insert the O rings into the ends of your strap. Make sure to penetrate both a stitch and a metal chain.
Finally attach the strap to the bag, by inserting each O ring into 2 stitches at the ends of the zipper.
Tips:
- These type of Bags need to be crocheted by applying extra tension, especially in the beginning. Your work must be really tight and firm to be able to give your bag it’ beautiful round shape.
- One more time I will underline the importance of choosing the right yarn. A thick sleek T-shirt yarn of excellent quality will provide the shape you see in the video. A yarn less thick and will produce a smaller bag, with soft sides.
- By creating this pattern I chοse to start my work with 3 continuous rounds of increases. This produced a wavy effect that was eliminated by 4 following rounds of no increase. Alternatively, you could work your rounds of increases by turns to avoid the wavy effect in the first place.
I am sure that can’t wait to get your hook in your hand and try this project and so I leave to watch the video and create an amazing Crochet Round Bag.